


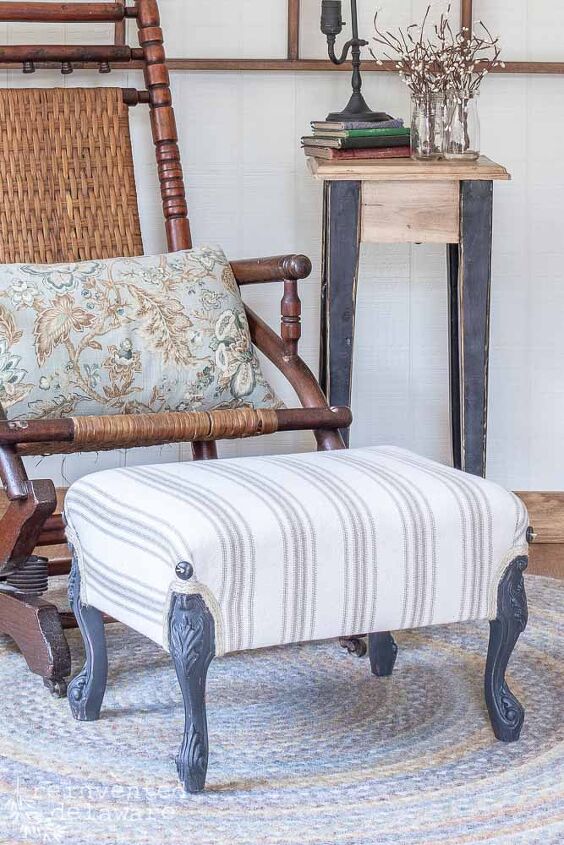
How to Upholster a Footstool

In this post, I will show you how to upholster a footstool. This is a great beginner upholstery project and I will show you step by step how to upholster a footstool!
If you need any supplies or tools, I have gathered some links for you! Thanks for shopping via the links. It really helps to support my blog and the free tutorials we offer here. If you purchase via our links, we do receive a small commission at no additional cost to you! Click here to read the full disclosure. Thanks so much!
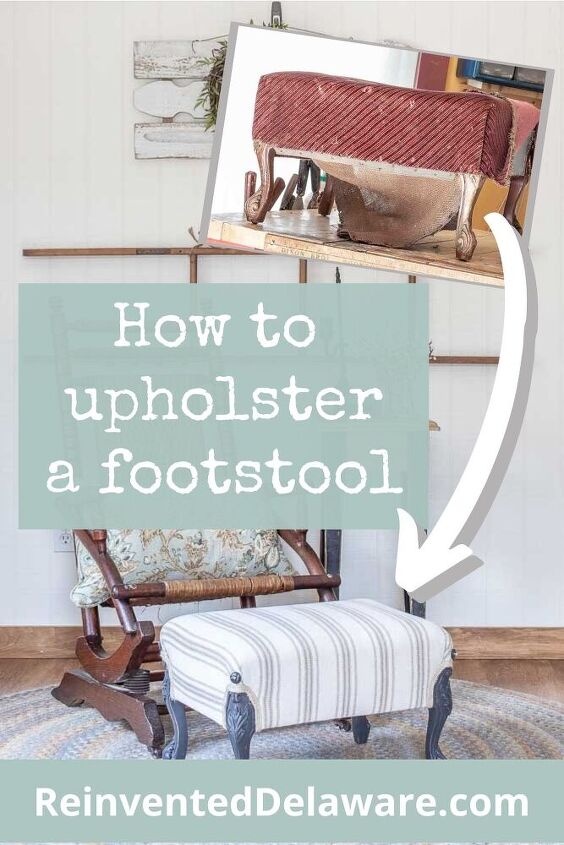
how to upholster a footstool
Upholstered footstools can be found in several places. Estate sales and auctions, yard sales, and vintage re-sell stores. I have found many footstools in places like these.
And they are usually not in the best of shape.
Like this one. Worn out red velvet fabric, rusted tack nails, and a bit smelly to boot!
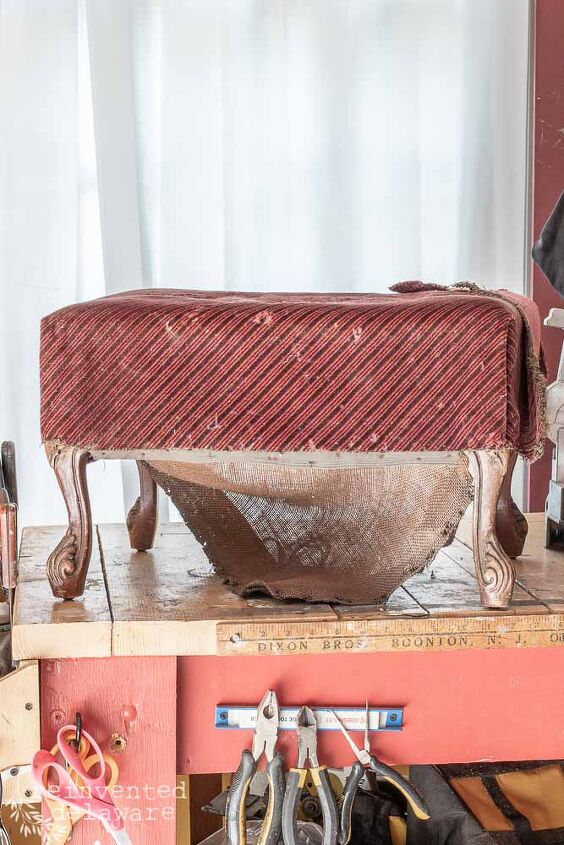
All these antique pieces need is a little love. That’s what we are going to do today! Share a little love to this tired footstool. This is a great beginner upholstery project!
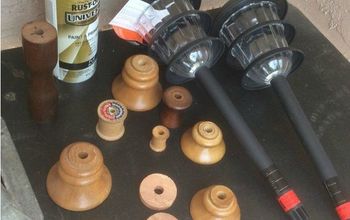
list of supplies:
- antique footstool (yard sales, thrift stores, auctions, estate sales)
- grainsack style upholstery fabric
- upholstery weight batting
- upholstery jute webbing
- braided jute trim
- cambric dust cover
- Fusion Mineral Paint
- scissors
- pliers
- tack remover
- pneumatic staple gun
- air compressor
- 3/8″ staples
- glue gun and glue sticks
- shop vac
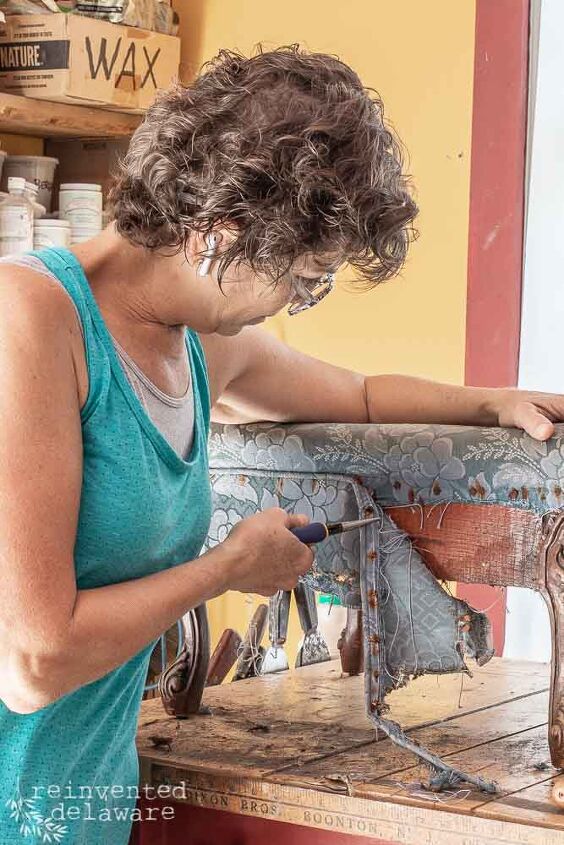
how to remove upholstery tacks
Removing the upholstery tacks and staples is time-consuming. It isn’t a hard job. In fact, it really requires no brainpower!
I turn on a podcast or audiobook and start pulling out the upholstery tacks and staples.
You will see in the video tutorial below the tools I used in action. Basically, I used spring-loaded pliers and an upholstery tack remover to get the tacks and staples out. This piece is pretty old so I only found rusted upholstery tacks – no staples in this piece.
BTW, did you notice there were two layers of different fabric on this footstool? Yeah, I notice too!! 😉
Be careful when pulling out the tacks, they can fly all over the place and would be on your workspace floor. Wear safety goggles too and pay attention to your hands. They can get banged up while you are working. You can use gloves to protect your hands!
Some of the tacks broke off so I couldn’t remove them. I removed as many as I could and then tapped in the rest with a small hammer.
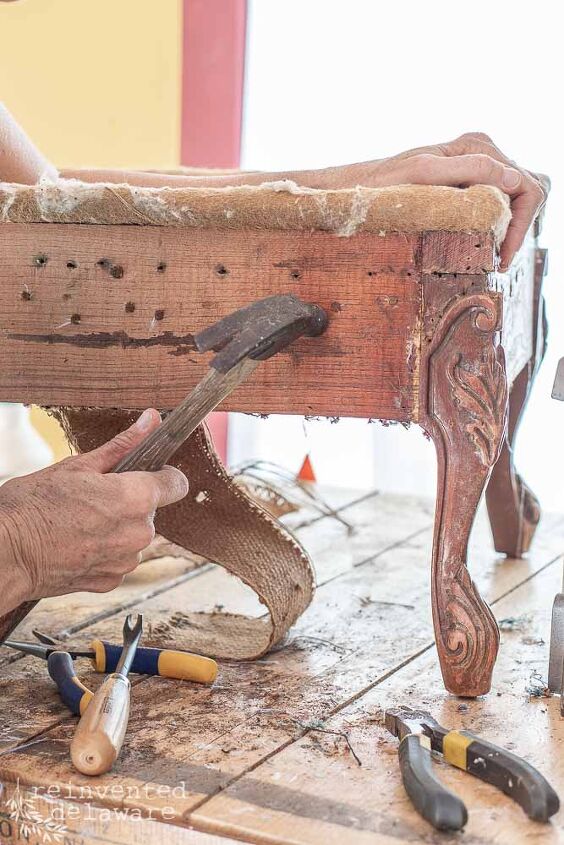
how to prep for upholstery
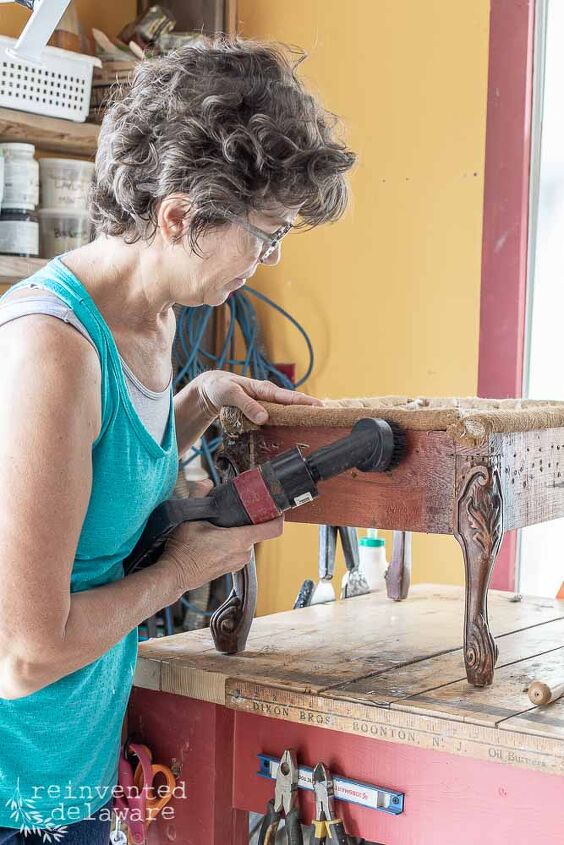
After removing all the tacks I could, I pulled out my shop vac. The footstool was covered in leftover batting and years of dust. The shop vac is the best way to remove all of the yuckiness!
I also ran the shop vac over my workbench and the floor. Those tacks are sharp and rusted and I don’t want to step on them!
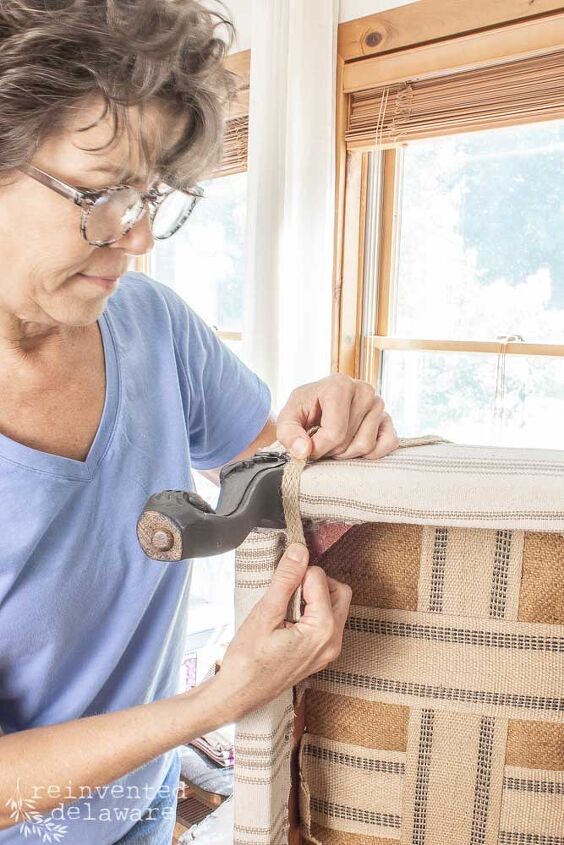
how to attach upholstery webbing
Usually, I do the dirty work of upholstery outside in my workshop. Then I bring the piece into my indoor workspace for the pretty part 🙂
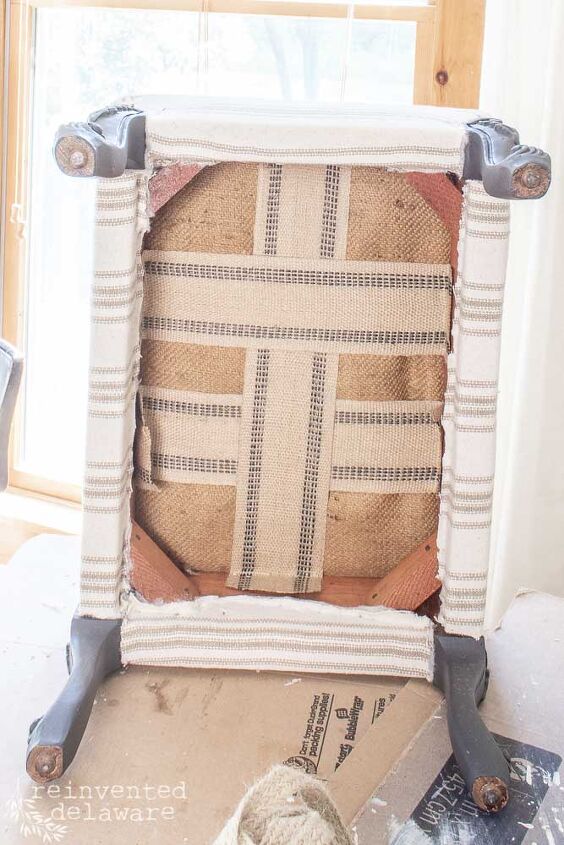
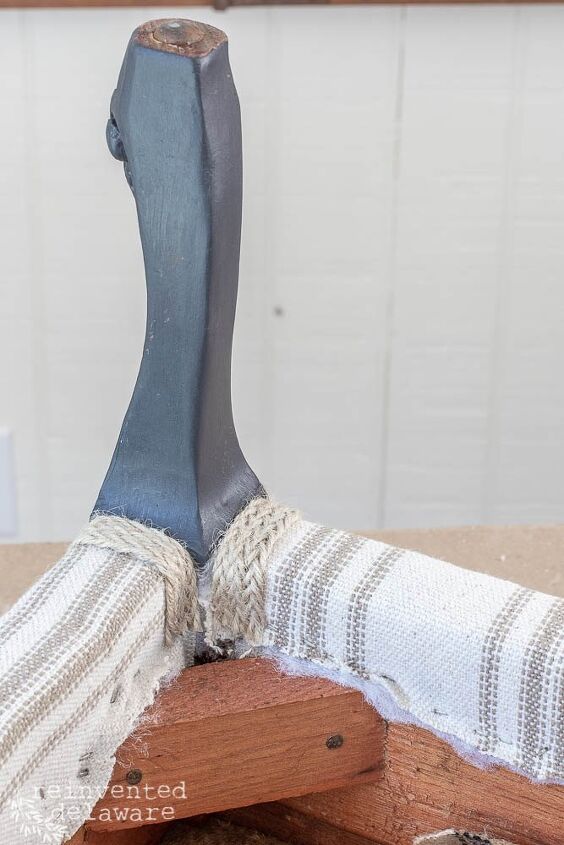
The burlap ‘seat’ of the upholstered footstool was sagging. The burlap itself didn’t need to be removed and neither did the thick upholstery piped edge.
I decided to shore up the sagging burlap with fresh upholstery webbing. I wasn’t able to use my upholstery webbing stretcher because of the framework of the stool. So I just stapled one end, flipped the stool over, and pulled the webbing as taunt as I could with my hands, and finished stapling using my pneumatic staple gun and air compressor.

I used two pieces of upholstery webbing across the widest part and one piece in the opposite direction, weaving the pieces through each other.
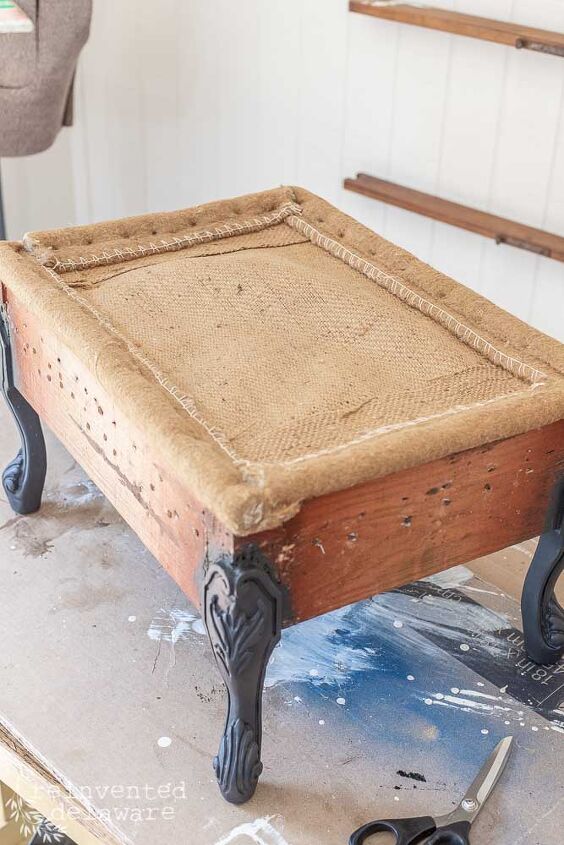
Did you notice I painted the legs on the footstool? I will talk about that in the YouTube video below!
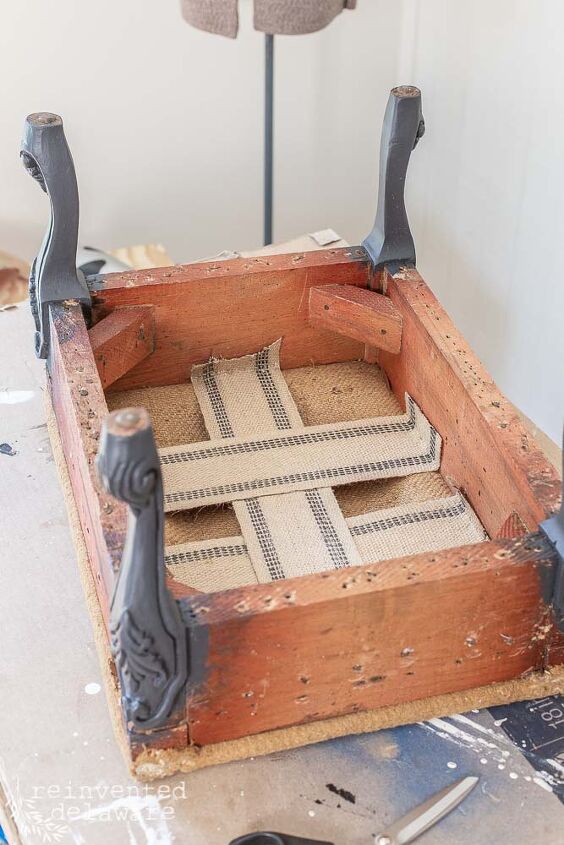
You can see below that the sagging burlap will be just fine with the webbing shoring it up from the underside. You can also see that the thick piped edge is in perfect condition. If they had not been in good shape, I would have replaced both.
Pro Tip: if the burlap is musty-smelling, spray it with Febreeze and let it dry completely before finishing the upholstery.
what fabric is best for upholstery?
There are so many upholstery weight fabrics out in the market today it can be hard to choose. I have used many over the years including dropcloth (use at least a 12oz weight!)
Lately, I have been hooked on the neutral, easy farmhouse look of grain sack. Real grain sacks are beautiful but they are pricey too.
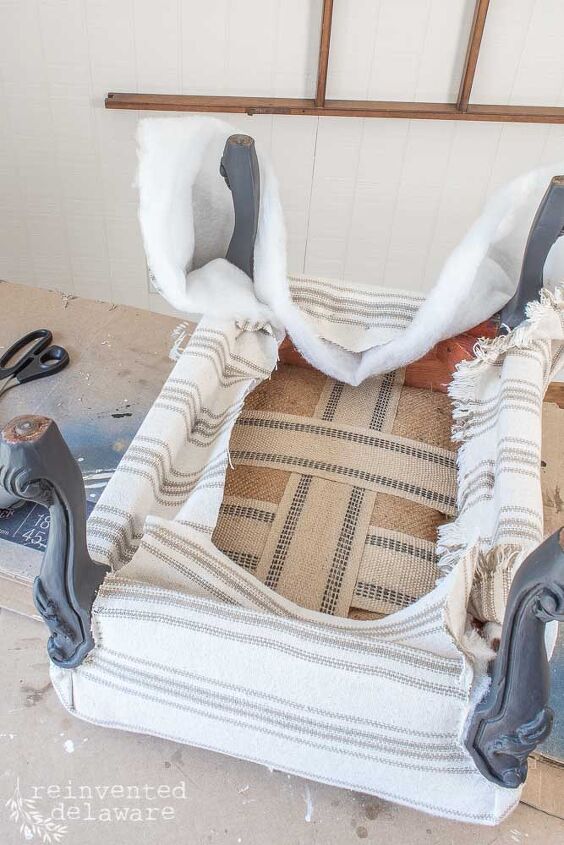
We try to keep our prices as low as possible for our local customers so I found an amazing reproduction grain sack fabric that can be purchased by the yard. It comes in several authentic grain sack colors like blue and red. I love the neutral color of the one you see below.
You will notice that I have also added a layer of new upholstery weight batting. Again, watch the video for more details about the batting!
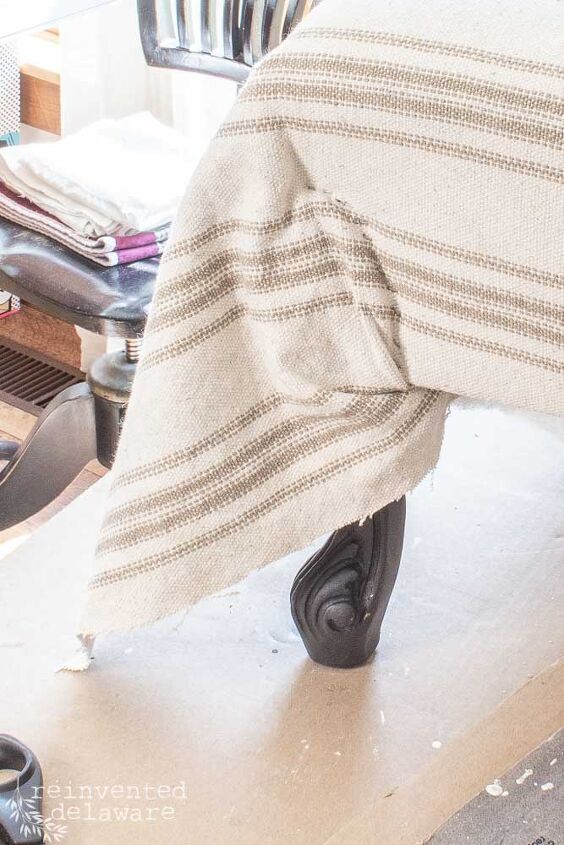
how to staple upholstery corners
Upholstering around curved details like the gorgeous legs on this footstool can be tricky. The key is to take your time.
Let me say that again: TAKE YOUR TIME!! (smiley face emojis and heart emojies!!)
After the underside was stapled and secured well, I tackled the corners.
I carefully pulled the fabric close to the curved section of the leg and using my fingers, felt around the curve so I would know exactly where to put each staple.
Enjoying this post? Want to see more? Sign up below to receive new posts!
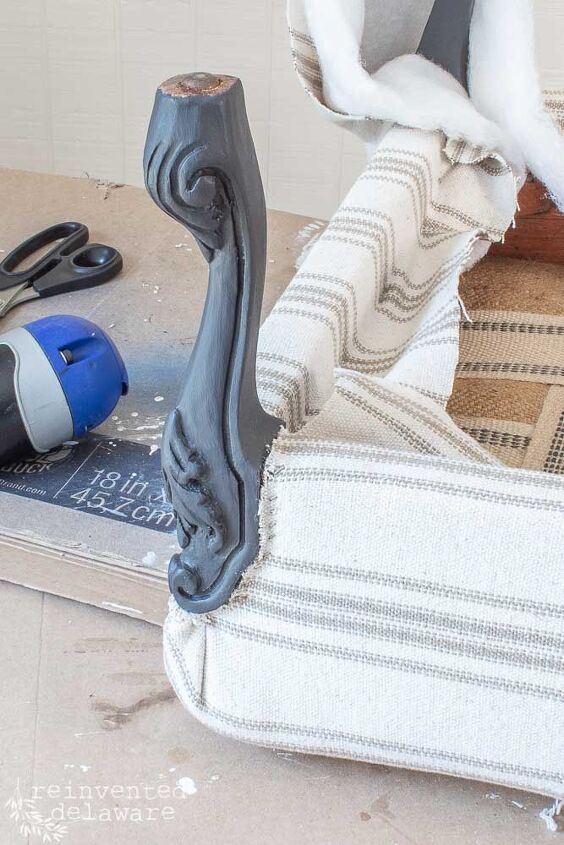
I worked slowly from the bottom up towards the center part of the curve and then did the same on the other side.
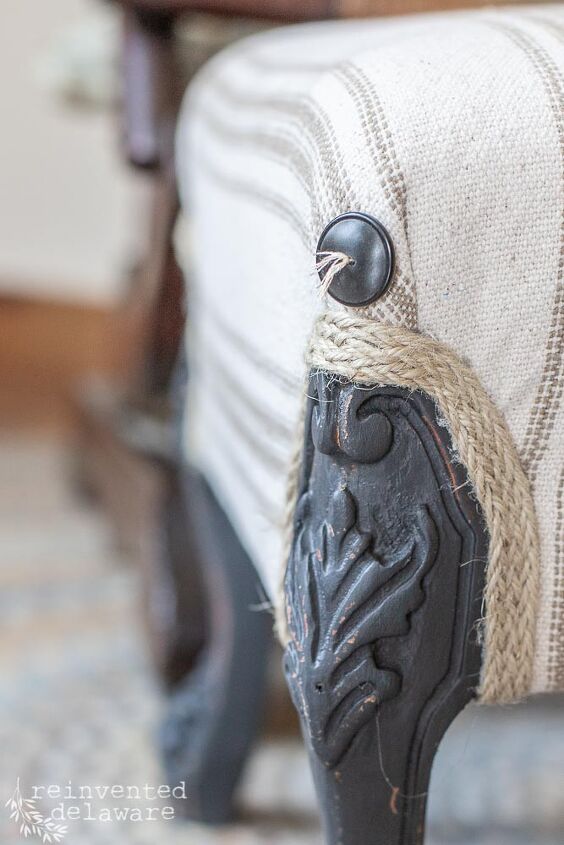
This creates an excess fold that you will see in the video. I used the fold to create a pleat that I think you will love! I even added a vintage button to the pleat!
Don’t forget to cut away the excess fabric after stapling!
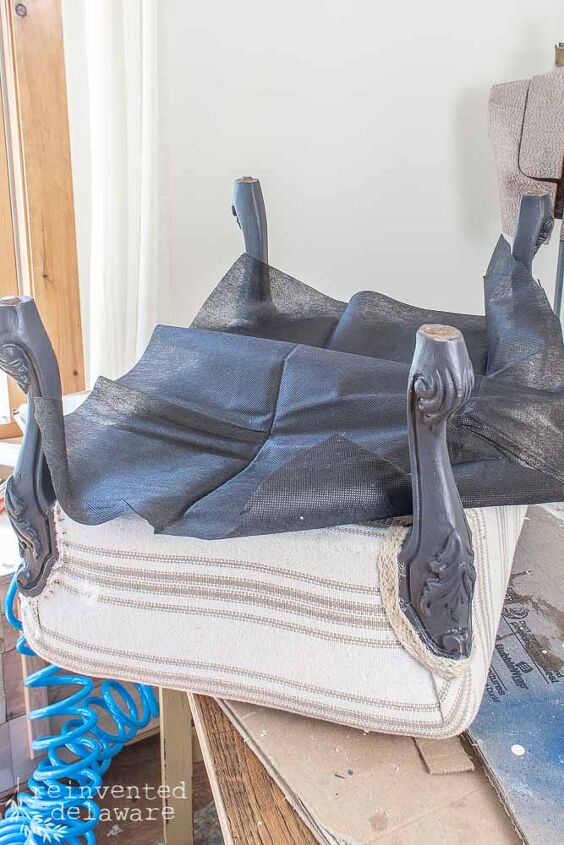
Here is a look at the underside after all the corners were finished. I double-checked myself to make sure all the fabric was secured to the frame of the footstool.
how to attach upholstery trim
I love easy upholstery projects like this! They move along so well (at least most times they do!) and then I get to this part of the process.
The jute trim. I’m not kidding when I say I love this stuff! It creates such a farmhouse touch to upholstered furniture!
And it is super easy to attach. I use a Gorilla Glue gun and Gorilla Glue Sticks and slowly move around the pretty carved legs of the footstool. I worked in small sections at a time.
You can see in the image how I finished off the ends inside the frame of the footstool.
Pro Tip: add a bit of glue to the end of the jute trim to prevent it from unraveling before your next project!
upholstery finishing technique
The last step in this how-to upholster a footstool project is to finish off the underside of the footstool. Cambric is also called a dust cover. It is a black (usually) fabric that gives a professional look to the piece.
I cut a piece a little larger than I need and fold over one edge. The folded edge will be inside the frame of the footstool and won’t be seen. I stapled at the center area and worked my way outwards to the legs. When one side was finished, I did the same to the opposite side. I did the same to the other two sides of the footstool.
Pro Tip: Don’t iron the cambric!! It will shrink and sort of melt!!
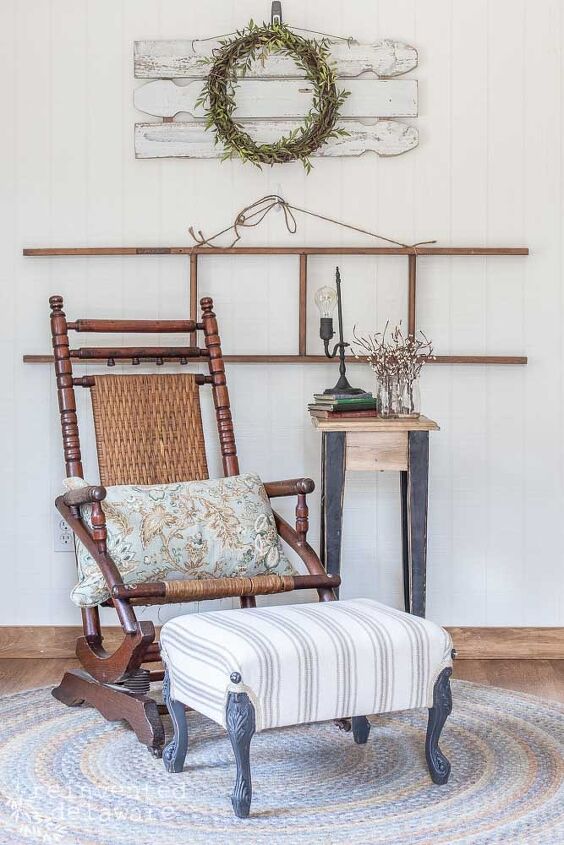
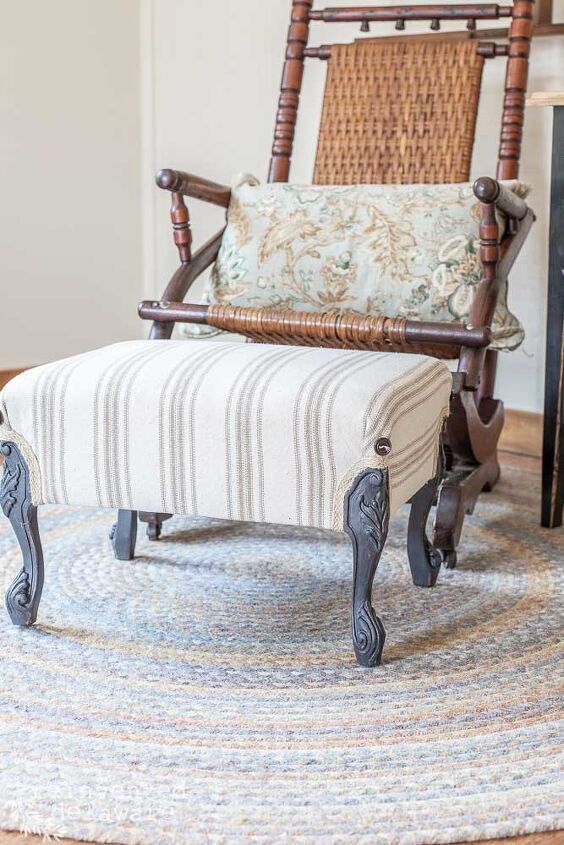
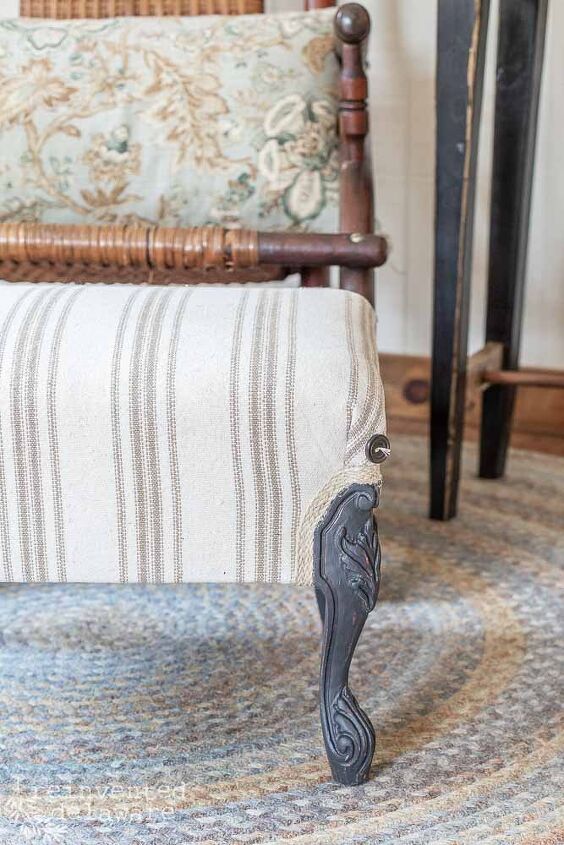
upholstered footstool reveal!
So what did you think of this tutorial on how to upholster a footstool? Pretty simple, don’t you think?
If you have ever wanted to learn how to upholster, I encourage you to begin with a small project like this one. Take your time and think through each step before moving on. In no time, you will have a lovely upholstered footstool like this one!
I’m sure of it!! Feel free to ask any questions that might pop up while you work! I would love to help answer your questions!
We have a whole category of upholstery projects. Check out the menu above called Textile Tutorials and you will find so many great posts on upholstery projects!
Here is the video I have mentioned several times. You will find it so helpful! While you are over on YouTube, I would love it if you subscribed to our channel. I have continually added all sorts of reinvented home decor and furniture tutorials and projects for you to learn from and enjoy!
Let’s look at some of the finished details! What do you think of the grain sack style fabric? It’s such a nice contrast to the black carved legs, don’t you think?
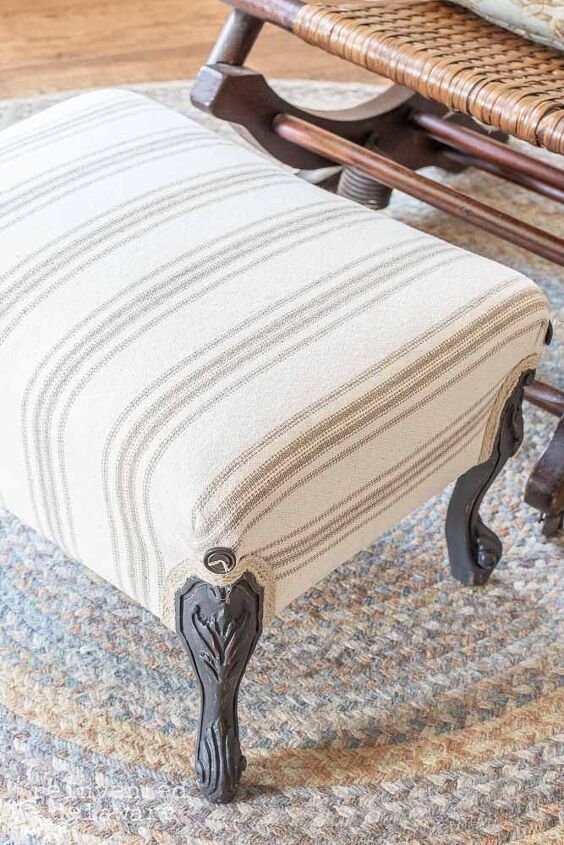
Speaking of the legs, you will notice I did a little bit of distressing to the Fusion Mineral Paint (I used Ash) After two coats of paint, I used my fancy distressing knife (aka thrifted knife!) to scrape off some of the paint.
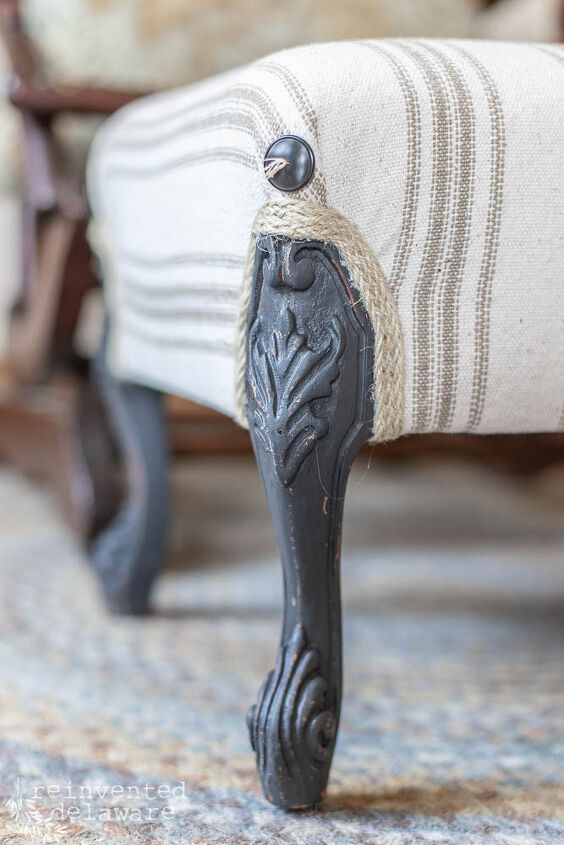
I also added vintage buttons to each corner over top of the pleat we created with the excess fabric. Each corner has a different style of a button!
Do you see why I love the braided jute trim??
I hope you choose to tackle an easy upholstery project like this upholstered footstool! Too many antique and vintage pieces are tossed into the trash and filling up our landfills when all they need is a little love.
Let’s be the kind of people who show a little love to a piece of furniture and the craftsman that made it 🙂
If you like this post, could you please pin it? Share this ‘how to upholster a footstool’ with your friends on Pinterest and on Facebook! Sharing helps us to continue to offer your our free tutorials here on our blog and over on our YouTube channel! Don’t forget to subscribe while you are there enjoying the furniture makeover tutorial!
pin it!!
Pin the image below to your home decor and furniture boards! Just click the pin button at the top left corner!
Thanks for joining our journey!
We would love you to join our journey over on Instagram and Facebook! You can also find more inspiration on our Pinterest page! We’re always pinning fresh ideas!
Want more ideas to reinvent? Sign up below and I will send you a list filled with inspiration! Plus, you’ll get the free tutorials sent straight to your inbox!
Until next time…

Resources for this project:


Comments
Join the conversation
-
Oh sorry I checked out your blog and seen you posted the list of items you used. Thank you again. Love the inspiration.
-
I love how it turned out it’s beautiful… but I really love your Rocking Chair .., it’s very beautiful….


Frequently asked questions
Have a question about this project?
Higher end weed barrier fabric looks just like cambric to me. Maybe save a few dollars?
Beautifully done and thanks for sharing great tips on how to use the tools. However what's the name brand of your staple gun and the size staples you used?