


Save Your Favorite Story by Learning How to Repair Book Binding

By Brooke Ressell
There’s nothing quite like finding the perfect book and getting lost in a really great story. Supporting the weight of the book in your hands, smelling its woody scent, and feeling the crinkling underneath your fingertips as you turn each page are all things that make the reading experience so much more enjoyable. So it’s such a shame when your favorite book starts falling apart, and you realize that it might be time to say goodbye.
But before you throw away an incredible book, consider learning how to fix the binding on your book so that you can continue enjoying it for years to come.
In this guide, we’ll show you how to repair book binding in several different ways. From fixing a binding with loose pages to fixing a broken book spine or sealing a gap between the pages and the spine, we’ll help you solve any of your book binding woes.
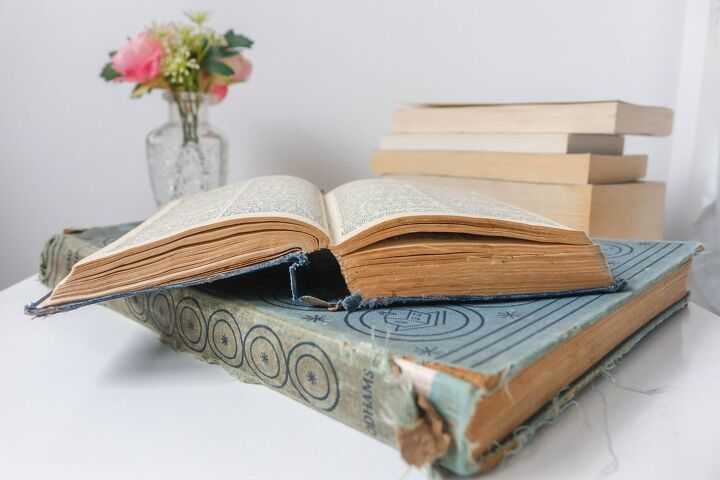
Photo via Shutterstock
How to Fix Book Binding Loose Pages
One of the most common ways a book starts to fall apart is when some of the pages get loose. This happens when a book's binding is exercised so much that the glue that binds the pages to the spine loses its grip on the pages.
We’ll show you how to fix a broken book binding with loose pages in the simplest way possible so you can get back to enjoying it as soon as possible.
Tools and Materials Needed:
- Acid-free book or binding glue
- Popsicle stick
- Rubber band
- Heavy textbooks
Step 1: Remove Loose Pages
Open the book and carefully remove any loose pages, setting them aside in the proper order.
Step 2: Glue the Spine
Squeeze a thin layer of acid-free book or binding glue along the inside of the book’s spine in the gap where the pages fell out.
It is really important that you use the right product for this fix. Using any other type of glue with acid in it can cause the pages and the book spine to disintegrate over time.
Step 3: Spread the Glue
Next, use a popsicle stick to spread the glue evenly down the length of the inside of the spine.
Step 4: Set the Loose Pages
Check to see that the loose pages are in the correct order and set them carefully onto the glued spine, making sure they are perfectly aligned before firmly pressing them down.
Step 5: Close and Secure the Book
Close the book and secure a rubber band around the entire book so that the pages stay in place while the glue dries.
Step 6: Stack Heavy Books
Stack a few heavy textbooks on top of the closed book that you are repairing. If you don’t have textbooks readily available, any other heavy object will do.
Step 7: Let Dry
Let the glue dry for 24 hours.
Step 8: Remove Heavy Textbooks
After the glue has dried for at least 24 hours, remove the stack of heavy textbooks from on top of the book.
Step 9: Open the Book
Open the book and flip through all of the pages. The previously loosened pages should now be securely fastened to the spine once again.
If any of the loosened pages failed to adhere to the book spine, repeat the process one more time.
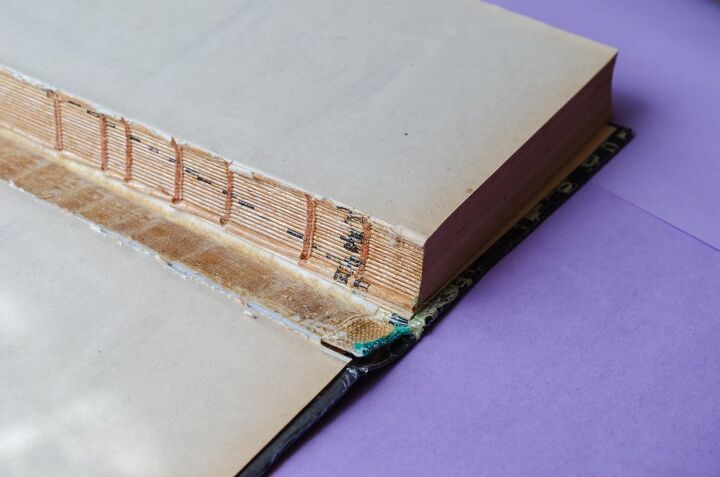
Photo via Shutterstock
How to Fix a Broken Book Spine
Another common way a book falls apart is when the spine breaks, which makes the book wobble in your hands as you try to read it. We’ll show you how to repair a hardback book binding with broken spine issues so that you can repair your hardback or textbook binding in no time.
Tools and Materials Needed:
- Acid-free book or binding glue
- Single-stitched binder tape
- Scissors
- Artist paint brush
- Ruler
- Wax paper
- 2 rubber bands
Step 1: Separate the Hinge
First, separate the hinge. The hinge is the section of the book where the book cover (or end cover) meets the book spine. To separate, hold both covers of the book and gently pull them in opposite directions to separate the hinge from the pages carefully. When you do this, the cover and end cover, as well as the spine and hinges, can now all lie flat on a table but the book itself is still intact.
Step 2: Cut Loose Items
If there are any loose threads or paper, use your scissors to cut them away from the text block (the block of paper formed by the cut and stacked pages of a book).
Step 3: Cut a Piece of Tape
Next, cut a piece of single-stitched binder tape to the same length as the text block.
Book Cover Length vs. Text Block Length
Step 4: Apply Glue
Use an artist paintbrush to coat one side of the single-stitch binder tape evenly with an acid-free book or binding glue.
Step 5: Attach the Tape
Once you have an even coat of glue, hold the dry tabs of the binder tape and attach one wet side of the binder tape to the text block and the other wet side of the binder tape to the spine. There will be two dry tabs left.
Step 6: Secure the Tape
Using a ruler, rub down the length of the tape along both the text block and the spine to help it adhere to them.
Step 7: Let Dry
Let the glue dry for up to 24 hours. You can check to make sure it is dry by checking the tape with your fingertips and seeing if it still feels wet.
Step 8: Cut Wax Paper
Cut a large piece of wax paper to fit on the text block and a smaller strip of wax paper that fits perfectly along the spine.
Step 9: Place the Wax Paper
Place the large piece of wax paper on the text block. It should rest above the binder tape that has already been glued down but below the dry binder tape tab that has not been glued down. Then, place the wax paper strip along the spine.
Step 10: Apply Glue
Using an artist’s paintbrush, apply glue evenly over the two binder tape tabs that were not previously glued down.
Step 11: Lift the Cover
Next, gently lift the cover of the book up so that it rests along the edge of the binder tape seam.
Step 12: Press the Tab
Gently press along the length of the tab that is parallel to the spine so that when you lift the cover up, it lays flat against this tab.
Step 13: Attach the Final Tab
Then, attach the final tab to the cover of the book.
Step 14: Secure the Tape
Rub the ruler along the length of the tape that is attached to the text block and the tape that is attached to the cover.
Step 15: Rub the Spine
Next, close the book and rub the ruler along the length of the spine to help the binder tape adhere to the spine.
Step 16: Secure the Book
Secure the book closed, keeping all of the tabs in place, by placing two rubber bands around it.
Step 17: Let Dry
Let the glue dry for up to 24 hours.
Step 18: Remove Rubber Bands and Wax Paper
Once the glue is completely dry, remove the rubber bands and wax paper from the book.
Step 19: Open the Book
Lastly, open the book and make sure that the spine has been fixed successfully.
How to Seal Gap Between Book Pages and Spine
The last type of book bind repair we’ll cover is how to seal a gap between the pages and the spine. For this project, we’ll teach you how to reglue the book spine so it stays in place.
Tools and Materials Needed:
- Acid-free book or binding glue
- Knitting needles
- Ruler
- Wax paper
- Heavy textbooks
- 2 flat boards
Step 1: Stand the Book Up
Stand the book up on one end (top or bottom of book) and use your fingers to gently open up the gap between the pages and the hinge.
Step 2: Dip the Knitting Needle
Dip your knitting needle into the tube of acid-free book or binding glue.
Step 3: Apply the Glue
Insert the coated knitting needle down the gap made by the pages and spine and rub it against the text block and spine to evenly coat them in glue.
Step 4: Flip the Book
If necessary, flip the book on its other end and apply glue from this side as well.
Step 5: Lay the Book Flat
Close the book, then lay it flat.
Step 6: Rub the Ruler
Next, press the text block against the spine and use the ruler to press the end pages into the hinge.
Step 7: Place Wax Paper
Place a large piece of wax paper between the cover and the pages as close to the hinge as possible so that any glue that leaks will not adhere itself to the cover.
Step 8: Rub the Hinge
Use your ruler to rub along the length of the hinge.
Step 9: Place Flat Boards, Knitting Needles, and Heavy Textbooks
Place the book on top of a flat board. Next, place one knitting needle under the book along the lower hinge and another knitting needle on top of the book along the upper hinge. Then, place the second flat board on top of the book and then several heavy textbooks on top of that.
Step 10: Let Dry
Let the glue dry for 24 hours.
Step 11: Remove Textbooks, Boards, Knitting Needles, and Wax Paper
After it has dried, remove the textbooks, flat boards, knitting needles, and wax paper from the book.
Step 12: Open the Book
Lastly, open the book and make sure that the gap has been repaired.
Have you saved a favorite book by repairing its binding? Let us know in the comments below!
Comments
Join the conversation
-
For such book lover as I this was quite a useful idea of repairing books bindings and covers as well. Being an essay professor I read a lot of books and for sure this interesting hobby and activity helps me to create better papers for students who are stuck with some of theirs home works. I am able to create better essays, papers and other academic works when I read some inspiring books, also sometimes books are quite inseparable part of my works who it comes to writing book report essays. Also reading books in cozy chair with cup of tea or cocoa is the best way of spending evening.
-
Your article on repairing book bindings was really informative and helpful. I appreciate the step-by-step guide with pictures, especially the tip about using wax paper to protect the pages. Your suggestion to use bookbinding glue and a brush also sounds like a great idea. By the way, have you considered offering your expertise to help people with marketing resume writing? If you're interested, you can learn more about how to start a successful marketing resume-writing service and monetize your skills. Thank you for sharing your knowledge and experience with us. Keep up the good work!


Frequently asked questions
Have a question about this project?
Why didn’t you provide a video?